31 August 2013

Guest Post: Novi from ColorsFrenzy

How's your weekend going so far? I'm at work this morning, and Saturdays are always the slowest :(

Continuing with the guest posts while my nubbin is growing out is Novi from ColorsFrenzy! :D ColorsFrenzy is a new-to-me blog, and run, don't walk! Go check her out! Novi does beautiful stamping!


Hi Polished & Glittered readers!

I’m Novi from the blog ColorsFrenzy (colorsfrenzy.blogspot.ca). I saw Patricia’s post on a facebook page, looking for someone to do a guest post for her blog. So I took a peek on her blog and shoot her an email, and she is kind enough to let me do it, this would be my first ever guest post ;)

I love stamping and most kind of nail art. So I thought I’d do some stamping to show you guys, and I’m showing you my first attempt on advance stamping. The plate I used here is Pueen 38 from Love Element set.


I started with painting the base color on all nails except my ring nail with OPI My Vampire Is Buff. While I was waiting for the polish to dry, I started to stamp as usual, using OPI Incognito in Sausalito. Then, using a small detail brush, I filled in the design on the stamper, just like coloring. For the bells, I used Nicole by OPI Mermaid for Each Other. For the bows, I used Zoya Micky and China Glaze Aquadelic. After I made sure my nails and the design on the stamper is completely dried, I applied top coat on the nail I’m about to stamp, waited a little bit, just until the nail is still tacky, not completely dried, then I transfer the design on the stamper on to my nail the same way I do in regular stamping. Clean up the excess design outside nail area and then top coat.
  
For my accent nail, I used OPI Dutch Ya Just Love OPI topped with OPI Pink Yet Lavender.


Hope you guys like it! And thank you Patricia for having me! J

XO

Novi


Isn't this beautiful?! <3 I definitely need to get the Pueen stamping plates! Thank you so much, Novi, for guest posting! :D

30 August 2013

Guest Post: Mel from Glitterfists

Happy Friday!  :) When this posts, I'll be at work, so I hope everyone has a great day! :D 

Mel from Glitterfists is guest posting today, and I love her blog. The layout is beautiful, and her swatches are amazing! <3 Mel is fairly new to blogging, so be sure to check out her blog! :D


Hi everyone! Patricia has so generously let me guest post on her blog while her “little nub” (as she calls it!) heals up. So, first off let’s wish Patricia a speedy recovery! And secondly, let me say thank you so much Patricia for letting me post! It means a lot and I’m honored to help you out while you’re healing up. You’re an amazing person and blogger! *hugs*

I’ve got a pretty simple swatch for you all. Nothing too fancy! I recently went to Ulta to pick up some necessities, as well as some not-so-necessities when I decided to check out the Butter London display. I had tried previous Butters before and had abysmal luck with them. They would always chip on me the first or second day of application, so I eventually gave up. However, I decided to give them another try!

I pawed through the colors and what strikes me about Butter are their hilarious names for their colors. They’re extremely unique, sometimes off the wall and other times just down right bizarre. I picked up a fluorescent pink jelly with iridescent blue sparks, turned it over and read the name, Disco Buscuit. Yep, this puppy was coming home with me. How could it not with that name?


This polish has restored a little faith in Butter for me because not only did it apply completely opaque in 3 coats, it dried extremely quickly but it actually lasted longer than 2 days on me! Wahoo!!  Application was a breeze; it actually applied like buttah (pun completely and utterly intended).

If you don’t have this shade, you should definitely get it. It’s so unique and not something I have in my collection. I’m not usually a pink fan, but this one has a special place in my stash.

Thanks again Patricia and I hope you all enjoyed!

xoxo Mel (glitterfists)


Thank you so much, Mel!! <3 I have yet to try butter London, but this is definitely going on my wish list! :D

I hope everyone has a great weekend, especially if you get a 3-day weekend! I have to work 4 hours tomorrow.. booo :( But I'm off Monday, so that makes up for it! :P


29 August 2013

Guest Post: Alex from Glittery and Polished

Hey guys! Hubby was out of town Tuesday night and got home late Wednesday night, so it was just me and the kiddos, which left little time to do anything blog-related, so I apologize for the gap in posts!

Today I have Alex from Glittery and Polished! Alex is really awesome, and I love her blog a lot! She has such beautiful nails! :D


Hello polish lovers! I'm Alex from Glittery and Polished, and today I came to help out Patricia with some polished nails of my own! I love anything glittery in any shape, way, or form! That's why I'm here ;) Glitter is my passion, so here's a glittery polish for you guys! Say hello to Lynnderella Remember 2013, a limited edition lacquer. 


Oh look at that patriotic goodness! I got this polish specifically in memory of my father. I plan to wear it on the dates he left for/returned from Iraq, or any other time I want to be patriotic :) This polish was made, so that we do not forget but remember the brave men and women who have fought for our freedom.


Remember 2013 is a milky blue shimmer base full of blue, red, white, and silver glitters in shapes like stars, diamonds, hearts, and hexes. I love different shapes of glitter! I put one coat of this polish over 1 coat of Zoya Indigo, along with some Seche Vite on top. I had to do a little placing of the glitters, but not much. For my accent nail, I used 3 coats of OPI Teal the Cows Come Home with a star stamp using Zoya Kimmy.


There it is. A lovely, glittery, patriotic beauty. I hope you have enjoyed the glitteriness! Three cheers for Patricia! Yeah! :D Thanks for having me!

You can buy Lynnderella polishes on her ebay store here: http://lynnderella.com/


What a fun glitter polish! :D Perfect for Memorial Day and the Fourth of July! I love the accent nail, too! Thank you so much for guest posting, Alex!

I have some more guest posts coming up, and this time, I'm going to be smart and schedule them for the rest of the week :P

Have a great night!


27 August 2013

Waterfall Nail Art

Even amongst all the guest posts this week while I wait for my nubbin to grow out, I couldn't NOT share this! Sammy at the The Nailasaurus came up with the waterfall nail art and has perfected it! I decided to give it a go, nubbin and all! :D


For my base color, I used Sally Hansen Insta-Dri Pink Blink (which was bought just for this mani because I didn't have a light pink creme!). For the tapered lines, I used Sally Hansen Complete Salon Manicure Shrimply Devine, China Glaze Naked, Finger Paints Model Colour, and Zoya Kimber. In person, these are really bright!

I absolutely love these and plan to do more in the future. The color combinations are endless! Have you tried waterfall nails yet? Show me on Facebook!

Guest Post: Lucy from The Nail Snail

Good morning! I totally meant to get this post up yesterday, but I fell asleep early watching CSI: NY :P Yesterday's guest post features Lucy from The Nail Snail :D Isn't that just the cutest name? :D


Hi! 

I’m Lucy from the Nail Snail and I’m so excited to be able to do a guest post for Patricia while her nubbin grows back. 

I love Patricia’s swatches, so for my guest I have swatches of two Darling Diva polishes: The Hot Chik and BzzBzz. I’ve actually never done swatches before, only nail art, so… well, here we go! 


As you can see, the Hot Chik is a very neon pink glitter topper in a clear base. It has a mix of different-sized glitters: hot pink hex glitters, square hot pink and orange glitters, and micro orange and pink glitters. It was crazy hard to capture its neon-fantastic-ness in a photo, and this was the best one I got: 


It’s more neon in real life, trust me. But overall it’s a very fun and eye-catching topper. It could be great with some other undies, but I thought that this light pink (Wet n Wild Tickled Pink) would do the best job of showing off the glitter. 

The other Darling Diva polish I swatched is BzzBzz, a mix of black and silver circular glitters and green micro glitters in a clear base:


I love the green micro glitters, they really pull the whole polish together! Once again, I could’ve used a more interesting undie, but.. well… you can’t go wrong with green glitter on green polish (in this case, Sephora by O.P.I. It’s Totally Karma). 

For both, I had to mess around a little to get the glitters in the right places that’s average for polishes like these. Drying time was faster than I’d expected, and they only needed one coat of Seche Vite to be completely smooth. 

These were the first two indie polishes I’ve ever tried, and I think they’re both very eye-catching and great for days when I just don’t feel like painting a lot of fancy stuff on my nails! Thanks so much to Patricia for letting me guest post on her blog, and hope you liked my first ever swatches!

Lucy

**Darling Diva polishes can be found in her Etsy Store but I think BzzBzz can only be found at Llarowe **


Thank you so much, Lucy! :D I think my favorite is BzzBzz. I love circle glitters! Stay tuned for another guest post and some waterfall nails I did! :D

25 August 2013

Guest Post: Brethil Ebontree from Druid Nails

Hey there, fellow lacqueristas! Last week, I was trying to take off a piece of nail that was peeling at the tip, and wouldn't you know, ended up tearing the entire nail off :( Needless to say, I had to cut down that nail to a nub. Now my nails aren't the same length and in no way, shape, or form to photograph since this happened on my swatching/photo hand :(

I reached out on here and in a group I'm in on FB for guest posters and the response has been amazing! :)

Today's guest post is from Brethil Ebontree from Druid Nails!


Hello readers!

I'm Brethil Ebontree from Druid Nails. Patricia asked for guest posters to fill her blog while her poor torn nail grows back. I jumped at the chance, I let her pick a theme and because we both play online games she chose games as the theme for my manicure. Personally I have been playing the online roleplaying fantasy game EverQuest 2 for 6 years and because I still enjoy it, I haven't tried any other games. Though I will probably try EverQuest Next when it launches in the future *winks*. My blog name was inspired by my main play character in EQ2, she is a Dwarven druid in the game. It was only natural to do a manicure inspired by EQ2 and my main play character.


I've never been very gifted at drawing and my nail art brushes have been sitting unused in a drawer of my Helmer for a while. I needed a good excuse to try free handing nail art. This guest post was the push I needed *chuckles*. The two brushes I used were a flat broad one and a small brush I clipped even thinner to get finer lines. I got these brushes in a set on eBay, very cheaply.


I started out with a nude base. In my area Catrice (German brand) is easily available, most polishes I own are from Catrice. You could use whichever polishes you have for this of course. I used Catrice's My Café Au Lait At Nôtre-Dame. I needed 3 coats for an even opacity. I let it dry completely. Next came the scary part, dipping the nail art brush in a polish and start. Best to just dive ahead *winks*.


On my thumb I recreated the EQ2 logo. I started with a blue base with Catrice's Hip Queens Wear Blue Jeans! that I applied with the wide nail art brush. When this was dry I mixed a drop of the blue with a white to lighten it. The logo goes from darker blue at the top to lighter at the bottom. When this was dry I took my very thin nail art brush and started on the lettering. For the lettering I used Essence INTI INKA, which is a warm yellow, not too bright. The lettering is not perfect, but I am pretty happy with the result anyway. I used a white polish for the edge.


On my index finger I made a stein of ale. A bare necessity for a Dwarf obviously. I painted the body of the stein with the wide nail art brush and NYC Prey of Grey. I did the handle with the thin brush. When this was dry I attempted a swirly pattern with a darker grey (super cheapo polish brand Max in the colour Metal). I ended with a foamy head with a white polish.


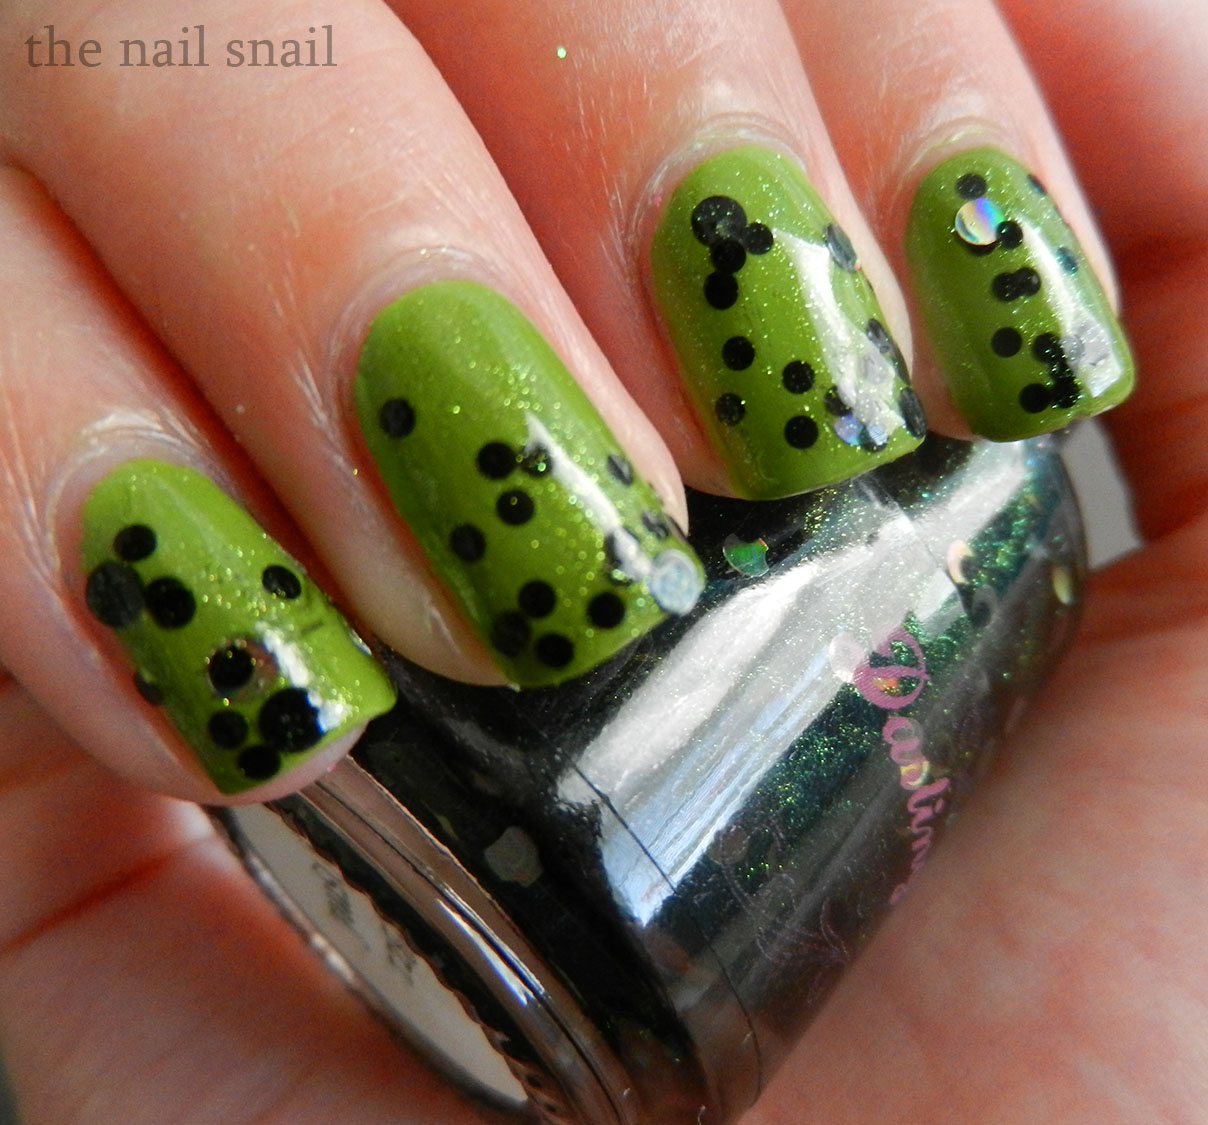
On my middle and ring finger I made druid rings. In EQ2 one of the things the druid classes can do is cast portals to the druid rings that are all over Norrath, which is the world of EQ2. These look like Stonehenge, each area is slightly different in colour of stone, if they have vines growing along them, but otherwise they're all similar. Using the wide nail art brush and NYC Prey of Grey I painted the stones. When this was dry I added very small blobs of a mossy green shimmery polish, which is very sheer, to make it look like the stone was covered in algae. The polish I used is by P2, colour 171. I have had this bottle for years and years, but it has been neglected for the most part. I used my fine nail art brush and Catrice's Dulce & Havanna to paint the vines growing around the stones. I added leaves with Catrice Hugo Moss. 


On my pinky I decided to make a quest feather. The game is called EverQuest for a reason of course. In EQ2 you can pick up quests from NPC's (Non-Player Characters) that will earn you coin, rewards or faction. You can recognise which NPC has a quest for you by the quest feather that hovers above their head. I used NYC Prey of Grey for the stalk and KIKO 378 Light Plum for the main body of the feather. I did some darker purple shading with Catrice How I Matt Your Mother, which is a dark matte purple. Don't you love the polish names Catrice comes up with?


I was too afraid to smudge this by the time I was done late at night, so I waited until morning to top coat this. I used Glisten & Glow's HK Girl top coat. No smudging! I've had top coats that would still smudge after hours of drying, which is highly annoying. HK Girl top coat is thick, dries fast and leaves a glossy shine.


That's it readers, my EQ2 Dwarven druid inspired manicure. I hope those of you who were just as hesitant to do free handing nail art as I was will try it themselves. You do not have to be good at drawing for this to try it! There will always be extremely talented people who will be better at free handing, but that does not matter. It will still feel good to look at something you did yourself and remember that most people will think you did something amazing!

Love, Brethil


Thank you so much, Brethil!! I love these! I'm a big gamer myself, although I haven't played in awhile. My favorites are WoW, Guild Wars and Guild Wars 2, and Rift, plus I'm really excited about The Elder Scrolls Online :D

Are any of you fellow gamers, as well?

Have a great Sunday and be on the lookout for more guest posts!


22 August 2013

Guest Posts Wanted! :)

Hey guys!! The other day I tore a nail on my swatching/photo hand *sad face* and I'm looking for people to guest post on Polished and Glittered! It'll be for a week, two at the most, until my nubbin grows back to the length of the rest of my hand. If you're interested, drop me a line at patricia@polishedandglittered.com :D You don't need to have a blog, either! It can be about anything nail polish or beauty related.

Thanks and have a great day!

18 August 2013

Sally Hansen Complete Salon Manicure Swatches and Review

Provided For Review

Oh, Sunday, how I don't like you! :( Tomorrow means going back to work for 5 and a half days, since I have to work 4 hours on Saturday!

Today I have 4 polishes from the Sally Hansen Complete Salon Manicure line that Coty (the parent company) was kind enough to send for review (along with some NYC goodies.. review coming soon!)

This is what Sally Hansen has to say about the Complete Salon Manicure line:

                    "Skip the salon, get the results. Don't settle for just color when you can get a base coat, strengthener, growth treatment, salon-inspired color, top coat, chip-resistance and a gel finish all in 1 bottle. Featuring the unique precision brush for a flawless finish and patented Vita Care technology for advanced 10 day wear, more shine and nourishing care."

As of now, it looks like there are 49 shades in this line of polish on their website. 

All photos are taken using a lightbox with daylight light bulbs.

I Lilac You, Arm Candy, and Barracude


17 August 2013

NOTW - Ninja Polish Ambrosia

Purchased By Me

Happy weekend!! :) I apologize for not posting in a couple of weeks. I work full time as a pharmacy technician, plus I have two kids who occupy my time after I get off work, so lately it's been hard to find time to blog and do anything nail polish related :( I'm hoping to get caught up this weekend, and right now, I'm doing a lot of editing of photos on my laptop since my 3 year old decided that he wanted to take over my desktop and watch cartoons in it.

Anyway!! This past week, I have been wearing Ninja Polish Ambrosia from the Enigma Collection. Ambrosia is a beautiful "hot pink jelly" with an equally beautiful shimmer throughout. I bought this along with Divinity when it was first released as a duo :) This is 3 coats of Ambrosia and 1 coat of G&G HK Girl top coat, and as you can see, there is still VNL.


Ninja Polish Ambrosia, along with the other polishes in the Enigma Collection, can be purchased on Ninja Polish for $11.00 USD for a 15ml bottle :) Currently, only Ambrosia and Shillelagh are in stock, but sign up for email notifications when the rest are in stock. I'm eyeballing a couple myself! :D

01 August 2013

Almost 400 Likes Giveaway!!

Purchased By Me

It's a giveaway! I was able to score the new Wet n Wild Pop Art Craze polish collection last week and picked up 2 extra sets to give away!


  • Giveaway is open to US/Canada residents only. If you're international and have a US address I can ship to, that is fine!
  • I am not responsible for any lost or stolen goods once it has left my hands.
  • Giveaway begins 8/1/13 and ends 8/23/13 at 12:00am CDT.
 Good luck!!


a Rafflecopter giveaway

Zoya PixieDust Fall 2013 Collection Swatches and Review

Provided For Review

I received the Zoya PixieDust Fall 2013 collection a couple of weeks ago and have finally had a chance to swatch and review these beauties! This is my first go at using textured polishes and I have to say, where have I been?? All of these were swatched without base and top coat, per Zoya's instructions, but top coat would make these even more stunning, especially if you're not a fan of texture on your nails ;-)

I just have to say, I think fall is my favorite season, with spring coming in at a close second! I love everything about fall: the cool, crisp air, leaves crunching under my feet, and the colors! Oh, the colors! I love dark, vampy, shimmery fall colors, and the wonderful transition from summer to fall, and the Zoya PixieDust Fall 2013 collection just screams fall! <3

Carter, Arabella, Dhara, Sunshine, Chita, and Tomoko